1. Setting a basic project up
Writing some Solidity code!
1.1 Directory Structure
Let start organizing the basics of our NFT contract repo! We'll want to start by creating some folders for the contract we will be writing and for the migration scripts that we will use to deploy those contracts
mkdir contracts
mkdir scripts
All Solidity code will run in contracts/, whereas scripts/ will contain some JavaScript files we will need to bootstrap the contracts and deploy them later on.
Let's write our first smart contract!
Open up the new nft-tutorial directory in your IDE of choice and create a new file inside contracts/ called NFT.sol
// SPDX-License-Identifier: MIT
pragma solidity ^0.8.18;

import "@openzeppelin/contracts/token/ERC721/ERC721.sol";
import "@openzeppelin/contracts/utils/Counters.sol";

contract NFT is ERC721 {
    using Counters for Counters.Counter;
    Counters.Counter private currentTokenId;

    constructor() ERC721("NFTTutorial", "NFT") {}

    function mintTo(address recipient)
        public
        returns (uint256)
    {
        currentTokenId.increment();
        uint256 newItemId = currentTokenId.current();
        _safeMint(recipient, newItemId);
        return newItemId;
    }
}
Here is a break down of some of the key portions of this code:
- In Line 2 we define the version of Solidity we want to use
- From Lines 4-5, we import the necessary contracts from OpenZeppelin to quickly create an implementation of ERC721 without having to "re-invent the wheel" of NFTs. The 2 contracts imported are:
ERC721.sol: a 'vanilla' implementation for Non-Fungible Tokens that already implements many useful helper functions. For more information, refer to OpenZeppelin's documentation.Counters.sol: Provides counters that can only be incremented, decremented or reset that we can use to keep track of total tokens minted as well as quickly get the next tokenId to mint.
- The next few lines define the NFT contract itself, with Line 7 defining NFT to inherit from ERC721. Note that Solidity contracts support using mixins and can inherit from several different contracts at once. More on that later.
- Lines 8-9 import and then declare a Counter that we will use to efficiently keep track of the total tokens minted in our contract.
- Line 11 defines the constructor, which for now simply calls its parent ERC721 constructor and passes in two strings:
nameandsymbol. For now, this constructor is fairly lightweight. - Finally, we define the ever-covetted
mintTofunction. This public function can be called by passing in a valid recipient address in order to mint a new NFT. For now, its very simple:- It increments our
currentTokenIdCounter, - Mints the next value of the Counter to the
recipient, using OpenZeppelin's nifty _safeMint() private method - Finally, it returns the newly minted token's ID back to the caller.
- It increments our
This very basic contract is pretty much all you need written before we can deploy and use it. Although we are missing many important features that make NFTs exciting today (which we will add soon), this basic implementation can be deployed and used on GonnaMakeIt or any other NFT marketplace.
Thanks to OpenZeppelin's standardized implementation, NFT contracts today don't have to implement many tedious functions like transferFrom.
After writing your contract, your project should look like this:
tree -L 3 -I 'node_modules*|cache*'
├── contracts
│   └── NFT.sol
├── hardhat.config.js
├── package-lock.json
├── package.json
└── scripts
1.2 Compiling our contract
Now that we have our (basic) contract written, let's work to compile it and make sure it is ready to go for deployment.
To do that, we're going to have to integrate our earlier-created MetaMask account into our project, since deploying the contract is going to cost us NRG.
First, let's create a new file, .env in the root folder of the project. We'll use this file to store the private key of our account.
- Get your private key from your MetaMask wallet by following the instructions here
Private keys are an all-access pass to the funds within your wallet. When fetching them, make sure you are in a safe, private environment and that you are not screen-sharing via any computer program.
RPC_URL = "rpc-url-energi"
ACCOUNT_PRIVATE_KEY = "private-key"
Next, update the hardhat.config.js file to add the following:
/** @type import('hardhat/config').HardhatUserConfig **/
require('dotenv').config();
require("@nomiclabs/hardhat-ethers");
require("@nomiclabs/hardhat-etherscan");

const { RPC_URL, ACCOUNT_PRIVATE_KEY } = process.env;

module.exports = {
  solidity: {
    version: '0.8.18',
    settings: {
      evmVersion: 'istanbul',
      optimizer: {
        enabled: true,
        runs: 200,
      },
    },
  },
  defaultNetwork: "energiTestnet",
  networks: {
    hardhat: {
      blockGasLimit: 10000000,
    },
    energiMainnet: {
      chainId: 39797,
      url: String(RPC_URL || "https://nodeapi.energi.network"),
      gas: 30000000,
      gasPrice: 20000000000, // 20 GWei
      accounts: [`0x${ACCOUNT_PRIVATE_KEY}`],
    },
    energiTestnet: {
      chainId: 49797,
      url: String(RPC_URL || "https://nodeapi.test.energi.network"),
      gas: 30000000,
      gasPrice: 20000000000, // 20 GWei
      accounts: [`0x${ACCOUNT_PRIVATE_KEY}`],
    },
  },
  etherscan: {
    apiKey: {
      energiTestnet: 'xxxxx-no-api-key-needed-xxxxx',
      energiMainnet: 'xxxxx-no-api-key-needed-xxxxx'
    },
    customChains: [
      {
        network: "energiMainnet",
        chainId: 39797,
        urls: {
          apiURL: "https://explorer.energi.network/api",
          browserURL: "https://explorer.energi.network"
        },
      },
      {
        network: "energiTestnet",
        chainId: 49797,
        urls: {
          apiURL: "https://explorer.test.energi.network/api",
          browserURL: "https://explorer.test.energi.network"
        },
      },
    ]
  },
}
These changes should be relatively straightforward:
Some required imports from
dotenvin order to use the variables we defined earlier and fromhardhat-ethersin order to later deploy our contract.A module configuration that defines our default Solidity version, default network, and some network configurations so that we can deploy the same code to Energi testnet, Energi mainnet, or any other network later on.
Lines 23-46, adds
customChainsfor Energi blockchain.
1.2.1 Validate custom chain
Run the following to validate custom chain:
npx hardhat verify --list-networks
...

Custom networks added by you or by plugins:

╔═══════════════╤══════════╗
║ network       │ chain id ║
╟───────────────┼──────────╢
║ energiMainnet │ 39797    ║
╟───────────────┼──────────╢
║ energiTestnet │ 49797    ║
╚═══════════════╧══════════╝
1.2.2 Compile the contract
We are now ready to compile the contract.
npx hardhat compile
Your results:
Downloading compiler 0.8.18
Compiled 13 Solidity files successfully
If all went well, the above command should work with no errors.
1.3 Deploying the contract
We are almost at the finish line! All that's left now is to write a simple deploy script in JavaScript and to run it using Hardhat.
Inside the scripts/ folder, create a file called deploy.js and implement it as follows:
async function main() {

    // Get our account (as deployer) to verify that a minimum wallet balance is available
    const [deployer] = await ethers.getSigners();

    console.log(`Deploying contracts with the account: ${deployer.address}`);
    console.log(`Account balance: ${(await deployer.getBalance()).toString()}`);

    // Fetch the compiled contract using ethers.js
    const NFT = await ethers.getContractFactory("NFT");
    // calling deploy() will return an async Promise that we can await on
    const nft = await NFT.deploy();

    console.log(`Contract deployed to address: ${nft.address}`);
}

main()
.then(() => process.exit(0))
.catch((error) => {
    console.error(error);
    process.exit(1);
});
This JS function fetches the compiled NFT contract from NFT.sol and deploys it. It also prints out your wallet balance before and after the deploy, since gas will be used in the transaction.
Most of this code is copied over from Hardhat. They did an excellent job of explaining the different components at play here in their tutorial. The section is full of useful Hardhat information not just related to testing.
Our project should now look like this
tree -L 3 -I 'node_modules*|cache*'
├── artifacts
│   ├── @openzeppelin
│   │   └── contracts
│   ├── build-info
│   │   └── f179c78b6322d2fddc1e72511467aa46.json
│   └── contracts
│       └── NFT.sol
├── contracts
│   └── NFT.sol
├── hardhat.config.js
├── package-lock.json
├── package.json
└── scripts
    └── deploy.js

8 directories, 6 files
The artifacts directory contains all our compiled contracts and their dependencies.
We are now ready to deploy the contract!
npx hardhat run scripts/deploy.js --network energiTestnet
You should see a response that looks like this:
Deploying contracts with the account: {ACCOUNT_ADDRESS}
Account balance: 2000000000000000000
Contract deployed to address: {NFT_CONTRACT_ADDRESS}
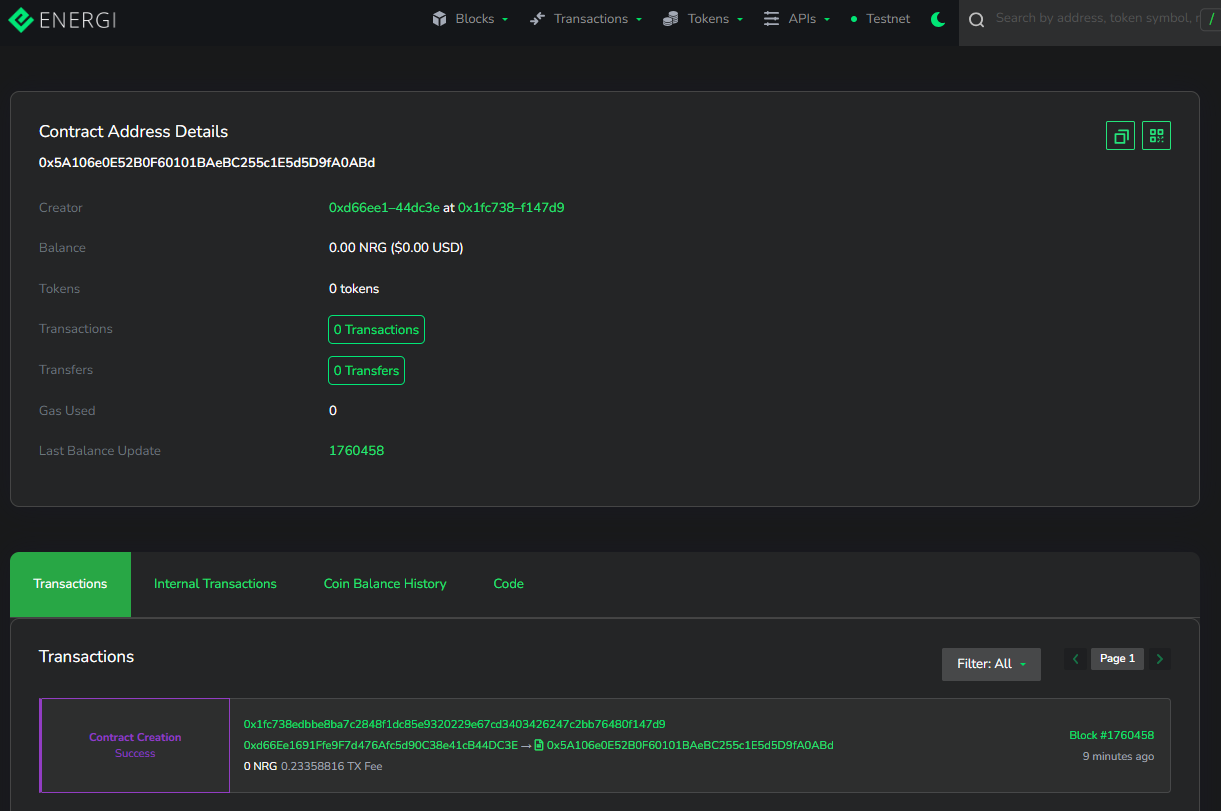
Grab that deployed contract address and head over to the Energi Block Explorer and see your deployed contract!
We defined both the Energi Testnet and Energi Mainnet as network options in hardhat.config.js. You can deploy the same exact contract code to mainnet (when we are ready) by replacing --network energiTestnet with --network energiMainnet in the command above.
1.4 Summary
This tutorial covered covered a lot! We went from an empty project to a deployed NFT in Energi Testnet. Congrats on making it this far!
To summarize what we did so far:
- We wrote a basic smart contract in Solidity that extends the existing ERC721 implementation
- We set up a basic Hardhat configuration file and compiled our contract
- Finally, we wrote a basic script to deploy our contract in JavaScript and actually deployed the contract to the Energi Testnet blockchain.
1.5 Next Steps
Our smart contract is out there, but we can't really easily do much with it just yet. In fact, we don't even know how to mint any tokens from it yet!
In the next tutorial, we'll go over how to mint tokens using some new scripts, how we can improve our contract to give it more advanced functionality such as mint purchase prices, and even add some neat metadata so that it actually shows your amazing art when users view it on GonnaMakeIt.
After that, we will go into more advanced topics like verifying your contract on Energi Block Explorer, deploying a companion website that anyone can browse to mint from your contract, and advanced Solidity concepts that can be used for neat mechanics within your contract.