2. Minting from your new contract and improvements
In this tutorial, we'll cover all the basics needed to mint an NFT to users wallets and some simple improvements we can make to get it ready for release to the public.
Let's start with minting.
If you haven't already, go back to the previous step in this tutorial and follow along to set up and deploy your own NFT contract.
2.1 Minting from your new NFT contract using Hardhat
Unfortunately for us, our NFT contract is not yet hooked up to a pretty minting website where we can use a UI to mint a new token. Fortunately for us, we can write a script that utilizes ethers.js and Hardhat to mimic the same behavior programmatically.
Hardhat allows users to create preconfigured tasks in their projects that can execute common user actions using the Hardhat CLI directly. We can actually move our earlier deploy.js script to be a task (since we will want to deploy new versions of the contract as we continue improving it) and introduce a new mint task to call the contract's mintTo() method.
To start, edit and replace the existing deploy.js file in the scripts/ folder with a task-based implementation:
const { getAccount } = require("./helpers");

task("check-balance", "Prints out the balance of your account").setAction(async function(taskArguments, hre) {
  const account = getAccount(hre);
  console.log(`Account balance for ${account.address}: ${await account.getBalance()}`);
});

task("deploy", "Deploys the NFT.sol contract").setAction(async function(taskArguments, hre) {
  const account = getAccount(hre);
  const nftContractFactory = await hre.ethers.getContractFactory("NFT", account);
  const gasLimit = await account.provider.getBlock("latest").then((block) => block.gasLimit);
  const nft = await nftContractFactory.deploy({ gasLimit });
  console.log(`Contract deployed to address: ${nft.address}`);
});
We've made quite a few changes here, but the overall logic is the same. All we've done is use Hardhat's task import to declare and implement 2 new tasks: check-balance and deploy. Check balance uses a getAccount() helper method which we will define shortly to fetch the account and make an async call getBalance(). Deploy works almost the same as the prior implementation.
Next, define some common helpers that we can reuse in later pieces of code. Create a new helpers.js file in the scripts/ folder and add in 3 new helper methods:
const { ethers } = require("ethers");

// Helper method for fetching environment variables from .env
function getEnvVariable(key, defaultValue) {
  if (process.env[key]) {
    return process.env[key];
  }
  if (!defaultValue) {
    throw `${key} is not defined and no default value was provided`;
  }
  return defaultValue;
}

// Helper method for fetching a connection provider to the Ethereum network
function getProvider(hardhat) {
  const network = getEnvVariable("NETWORK", "energiTestnet");
  const providerUrl = getEnvVariable("RPC_URL", "https://nodeapi.test.energi.network");

  const networkConfig = hardhat.config.networks[network];
  if (!networkConfig) {
    throw new Error(`Network '${network}' is not defined in the hardhat.config.js file.`);
  }

  return new ethers.providers.JsonRpcProvider(providerUrl, networkConfig.chainId);
}

// Helper method for fetching a wallet account using an environment variable for the PK
function getAccount(hardhat) {
  const privateKey = getEnvVariable("ACCOUNT_PRIVATE_KEY");
  const provider = getProvider(hardhat);
  const wallet = new ethers.Wallet(privateKey, provider);
  return wallet;
}

module.exports = {
  getEnvVariable,
  getProvider,
  getAccount,
};

module.exports = {
  getEnvVariable,
  getProvider,
  getAccount,
};
This new helpers file moves common logic we will need to use a lot (like getting an environment variable or the account based on the private key (PK) we added in the .env file) and exports them as easy-to-use helpers.
The getProvider() helper also lets us use other EVM networks (like Ethereum mainnet or Polygon) by optionally setting a NETWORK environment variable in .env.
Last, let's slightly modify the hardhat.config.js configuration file to import our newly defined tasks.
/** @type import('hardhat/config').HardhatUserConfig **/
require('dotenv').config();
require("@nomiclabs/hardhat-ethers");
require("@nomiclabs/hardhat-etherscan");
require("./scripts/deploy.js");

const { RPC_URL, ACCOUNT_PRIVATE_KEY } = process.env;

module.exports = {
  solidity: {
    version: '0.8.18',
    settings: {
      evmVersion: 'istanbul',
      optimizer: {
        enabled: true,
        runs: 200,
      },
    },
  },
  defaultNetwork: "energiTestnet",
  networks: {
    hardhat: {
      blockGasLimit: 10000000,
    },
    energiMainnet: {
      chainId: 39797,
      url: String(RPC_URL || "https://nodeapi.energi.network"),
      gas: 30000000,
      gasPrice: 20000000000, // 20 GWei
      accounts: [`0x${ACCOUNT_PRIVATE_KEY}`],
    },
    energiTestnet: {
      chainId: 49797,
      url: String(RPC_URL || "https://nodeapi.test.energi.network"),
      gas: 30000000,
      gasPrice: 20000000000, // 20 GWei
      accounts: [`0x${ACCOUNT_PRIVATE_KEY}`],
    },
  },
  etherscan: {
    apiKey: {
      energiTestnet: 'xxxxx-no-api-key-needed-xxxxx',
      energiMainnet: 'xxxxx-no-api-key-needed-xxxxx'
    },
    customChains: [
      {
        network: "energiMainnet",
        chainId: 39797,
        urls: {
          apiURL: "https://explorer.energi.network/api",
          browserURL: "https://explorer.energi.network"
        },
      },
      {
        network: "energiTestnet",
        chainId: 49797,
        urls: {
          apiURL: "https://explorer.test.energi.network/api",
          browserURL: "https://explorer.test.energi.network"
        },
      },
    ]
  },
}
We can now run our new tasks using the Hardhat CLI to quickly repeat common actions:
npx hardhat --help
Hardhat version 2.15.0

Usage: hardhat [GLOBAL OPTIONS] <TASK> [TASK OPTIONS]

GLOBAL OPTIONS:

  --config              A Hardhat config file.
  --emoji               Use emoji in messages.
  --flamegraph          Generate a flamegraph of your Hardhat tasks
  --help                Shows this message, or a task's help if its name is provided
  --max-memory          The maximum amount of memory that Hardhat can use.
  --network             The network to connect to.
  --show-stack-traces   Show stack traces (always enabled on CI servers).
  --tsconfig            A TypeScript config file.
  --typecheck           Enable TypeScript type-checking of your scripts/tests
  --verbose             Enables Hardhat verbose logging
  --version             Shows hardhat's version.


AVAILABLE TASKS:

  check         Check whatever you need
  check-balance Prints out the balance of your account
  clean         Clears the cache and deletes all artifacts
  compile       Compiles the entire project, building all artifacts
  console       Opens a hardhat console
  deploy        Deploys the NFT.sol contract
  flatten       Flattens and prints contracts and their dependencies. If no file is passed, all the contracts in the project will be flattened.
  help          Prints this message
  node          Starts a JSON-RPC server on top of Hardhat Network
  run           Runs a user-defined script after compiling the project
  test          Runs mocha tests
  verify        Verifies contract on Etherscan

To get help for a specific task run: npx hardhat help [task]
npx hardhat check-balance
Account balance for 0xd66Ee1691Ffe9F7d476Afc5d90C38e41cB44DC3E: 496162367925141460
npx hardhat deploy
Contract deployed to address: 0xd66Ee1691Ffe9F7d476Afc5d90C38e41cB44DC3E
The deploy command outputs the address of the NFT contract we just deployed. Hold on to this address, since we will need to use it in the next chapter of this tutorial.
2.2 Adding a minting task
Now we can move on to new stuff: creating a mint task to actually call our smart contract! Add a new mint.js file to your scripts folder and write the task:
const { task } = require("hardhat/config");
const { getContract } = require("./helpers");

task("mint", "Mints from the NFT contract")
.addParam("address", "The address to receive a token")
.setAction(async function (taskArguments, hre) {
    const contract = await getContract("NFT", hre);
    const transactionResponse = await contract.mintTo(taskArguments.address, {
        gasLimit: 500_000,
    });
    console.log(`Transaction Hash: ${transactionResponse.hash}`);
});
This new task, which takes in an --address CLI flag, gets an instance of the contract we deployed in the previous step and calls it's mintTo() function with the address we will pass in the command line. In order for this to work, we will need to do 2 more things:
- Set the address for the contract we deployed as an environment variable
- Implement a new helper --
getContract()in order to get an instance of the NFT contract
2.2.1 Adding a new environment variable
Open up the .env file you created in the last chapter of the tutorial and add a new variable NFT_CONTRACT_ADDRESS and set it to the
RPC_URL = "rpc-url-energi"
ACCOUNT_PRIVATE_KEY = "private-key"
NETWORK="energiTestnet"
NFT_CONTRACT_ADDRESS="0x5A106e0E52B0F60101BAeBC255c1E5d5D9fA0ABd"
2.2.2 Adding the getContract() helper
Now we will need to implement a new helper for fetching contract instances that we can then make calls to directly. Here's what helpers.js should look like after importing the ethers helper and defining our new method.
const { ethers } = require("ethers");
const { getContractAt } = require("@nomiclabs/hardhat-ethers/internal/helpers");

// Helper method for fetching environment variables from .env
function getEnvVariable(key, defaultValue) {
  if (process.env[key]) {
    return process.env[key];
  }
  if (!defaultValue) {
    throw `${key} is not defined and no default value was provided`;
  }
  return defaultValue;
}

// Helper method for fetching a connection provider to the Ethereum network
function getProvider(hardhat) {
  const network = getEnvVariable("NETWORK", "energiTestnet");
  const providerUrl = getEnvVariable("RPC_URL", "https://nodeapi.test.energi.network");

  const networkConfig = hardhat.config.networks[network];
  if (!networkConfig) {
    throw new Error(`Network '${network}' is not defined in the hardhat.config.js file.`);
  }

  return new ethers.providers.JsonRpcProvider(providerUrl, networkConfig.chainId);
}

// Helper method for fetching a wallet account using an environment variable for the PK
function getAccount(hardhat) {
  const privateKey = getEnvVariable("ACCOUNT_PRIVATE_KEY");
  const provider = getProvider(hardhat);
  const wallet = new ethers.Wallet(privateKey, provider);
  return wallet;
}

// Helper method for fetching a contract instance at a given address
function getContract(contractName, hre) {
  const account = getAccount(hre);
  return getContractAt(hre, contractName, getEnvVariable("NFT_CONTRACT_ADDRESS"), account);
}

module.exports = {
  getEnvVariable,
  getProvider,
  getAccount,
  getContract,
};
Note that we also need to export this new helper as part of module.exports in Lines 37 - 40. The very last step is importing the new mint.js file to our hardhat.config.js configuration so that it is picked up by Hardhat:
/** @type import('hardhat/config').HardhatUserConfig **/
require('dotenv').config();
require("@nomiclabs/hardhat-ethers");
require("@nomiclabs/hardhat-etherscan");
require("./scripts/deploy.js");
require("./scripts/mint.js");

const { RPC_URL, ACCOUNT_PRIVATE_KEY } = process.env;

module.exports = {
  solidity: {
    version: '0.8.18',
    settings: {
      evmVersion: 'istanbul',
      optimizer: {
        enabled: true,
        runs: 200,
      },
    },
  },
  defaultNetwork: "energiTestnet",
  networks: {
    hardhat: {
      blockGasLimit: 10000000,
    },
    energiMainnet: {
      chainId: 39797,
      url: String(RPC_URL || "https://nodeapi.energi.network"),
      gas: 30000000,
      gasPrice: 20000000000, // 20 GWei
      accounts: [`0x${ACCOUNT_PRIVATE_KEY}`],
    },
    energiTestnet: {
      chainId: 49797,
      url: String(RPC_URL || "https://nodeapi.test.energi.network"),
      gas: 30000000,
      gasPrice: 20000000000, // 20 GWei
      accounts: [`0x${ACCOUNT_PRIVATE_KEY}`],
    },
  },
  etherscan: {
    apiKey: {
      energiTestnet: 'xxxxx-no-api-key-needed-xxxxx',
      energiMainnet: 'xxxxx-no-api-key-needed-xxxxx'
    },
    customChains: [
      {
        network: "energiMainnet",
        chainId: 39797,
        urls: {
          apiURL: "https://explorer.energi.network/api",
          browserURL: "https://explorer.energi.network"
        },
      },
      {
        network: "energiTestnet",
        chainId: 49797,
        urls: {
          apiURL: "https://explorer.test.energi.network/api",
          browserURL: "https://explorer.test.energi.network"
        },
      },
    ]
  },
}
We are now ready to go! To mint tokens, call our new mint task:
npx hardhat mint --address 0xd66Ee1691Ffe9F7d476Afc5d90C38e41cB44DC3E
========= NOTICE =========
Request-Rate Exceeded  (this message will not be repeated)

The default API keys for each service are provided as a highly-throttled,
community resource for low-traffic projects and early prototyping.

While your application will continue to function, we highly recommended
signing up for your own API keys to improve performance, increase your
request rate/limit and enable other perks, such as metrics and advanced APIs.

For more details: https://docs.ethers.io/api-keys/
==========================
Transaction Hash: 0x2612e88c8ae87da4c9d4f7139100b8789ae38d1421ff8f135d7de3811eae3875
If you take that transaction hash over to Energi Block Explorer, you should see something like this:
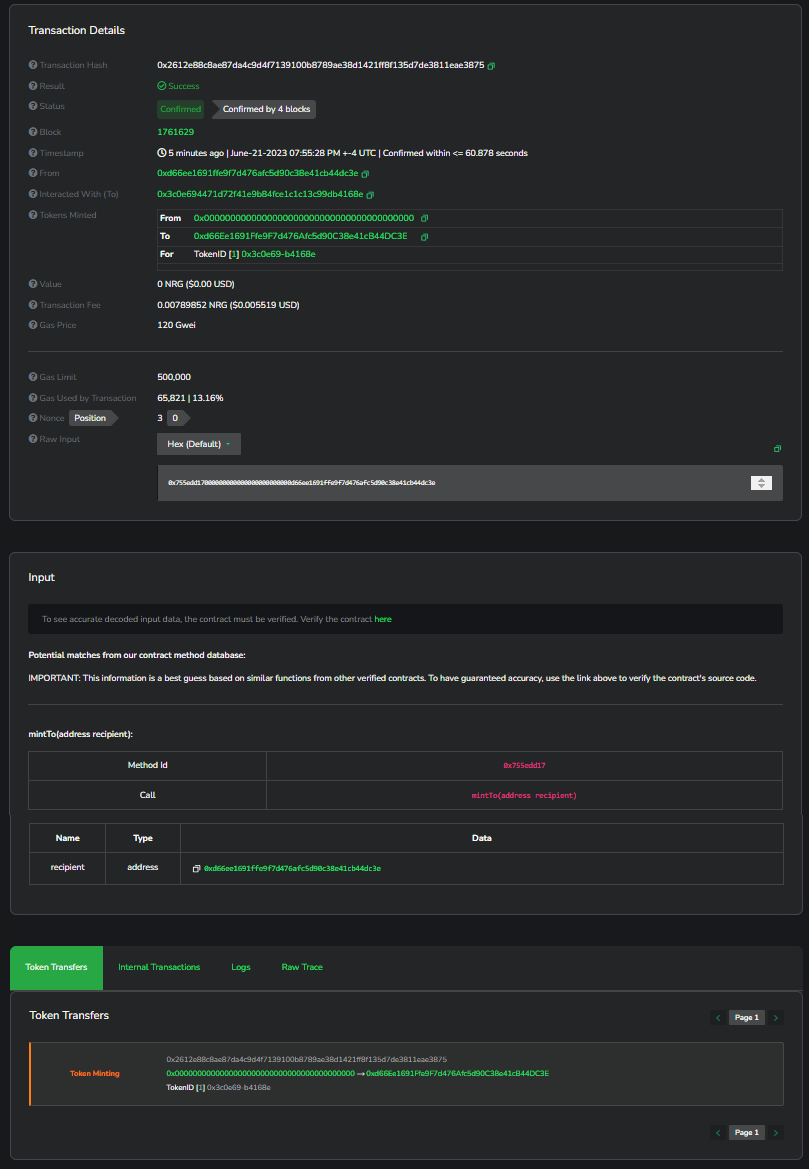
This transaction record shows us who called the contract function, what the outcome was (Tokens Transferred) and how much the transaction cost the caller in both gas fees and cost to transact.
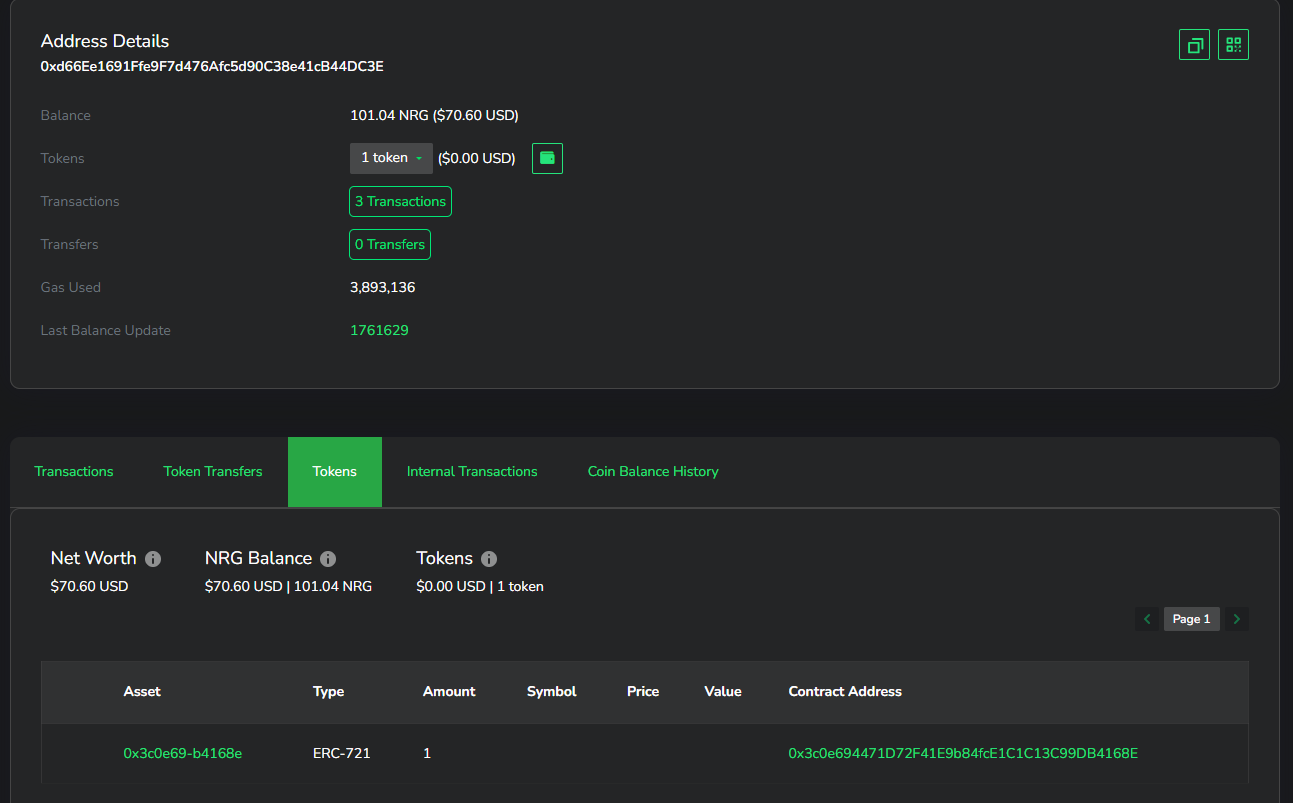
If you check the account, you will see a token was minted!
2.3 Summary
If you followed this chapter of the tutorial right, your project should be structured like this:
tree -L 3 -I 'node_modules*|cache*'
> tree -L 3 -I 'node_modules*|cache*'
.
├── LICENSE
├── README.md
├── artifacts
│   ├── @openzeppelin
│   │   └── contracts
│   ├── build-info
│   │   └── f179c78b6322d2fddc1e72511467aa46.json
│   └── contracts
│       └── NFT.sol
├── contracts
│   └── NFT.sol
├── hardhat.config.js
├── package-lock.json
├── package.json
└── scripts
    ├── deploy.js
    ├── helpers.js
    └── mint.js

8 directories, 10 files
This is now a fully functioning NFT item minted to your wallet and ready to be used. You can continue to call npx hardhat mint --address {address} in order to mint more tokens to your wallet. You can also call deploy again to deploy the contract another time.
You can view the repository in a complete state for chapter 2 on this dedicated branch on Gitlab.
2.4 Next Steps
If you stop here, you already have a deployed NFT contract that can be easily minted from yourself. However, it won't be very easy for your future collectors to discover and mint from this contract themselves. Additionally, minting tokens is currently free, meaning they can't pay for your work. Most importantly, the tokens you mint are not associated with any metadata, so they can't be visually represented on GonnaMakeIt or on your dedicated website.
In the next chapter of the tutorial, we will go over assigning metadata to individual tokens as well as adding a flat price for minting from the contract.